Backpacking Rim To Rim In The Grand Canyon
It’s the most iconic hike in Arizona, maybe in the whole country, and it’s on every accomplished hiker’s bucket list. Justifiably so. There’s just something about dropping off the rim of the Grand Canyon, descending to the bottom, crossing the Colorado River, and ascending back up to the other rim. The route offers a little bit of everything the Canyon has to offer: sweeping vistas, narrow side canyons, enchanting creeks, and precipitous drop-offs. See below for what you need to know to backpack the Rim To Rim.
| Miles | Elevation | Hours | |
| Day 1 | 6.4 | +988/-5156 | 4-6 |
| Day 2 | 7.8 | +1130/-2626 | 6-8 |
| Day 3 | 4.8 | +2357/-1046 | 4-6 |
| Day 4 | 4.3 | +3416/-483 | 3.5-5 |
Logistics
The Trailhead – Because the north rim is over 1,000 feet higher than the south rim, this hike is usually done north to south. Going south to north is definitely an option but makes it significantly more challenging. To start in the north, use the North Kaibab trailhead, reached via Hwy 67 out of Jacob Lake, AZ (Stop here and get a cookie or two. Trust me.).
Traffic and Parking – While the north rim entrance is significantly less crowded than the south rim, it still gets busy here in the summer, especially on weekends. Leave a little extra time to get through the entrance gate. There is a small parking lot at the trailhead where you can leave your car during your hike. There is no public transportation option to the north rim from anywhere other than the south rim.
Lodging and Transportation – Unless you have a very good friend who will drop you off on the north rim and pick you up on the south rim, you’ll need shuttle service for this hike. Contact Trans-Canyon Shuttle. The logistics can be tricky. The shuttle leaves the south rim (leave your car at the backcountry center) at 8:00am and 1:00pm. One option is to catch the 8am shuttle and begin the hike when you arrive at the north rim around 1pm. The disadvantage to this approach is you end up either hiking in the dark (early or late season) or in the heat (summer months). The other option is to spend the night before on the north rim. You get to begin your hike whenever you want but places to stay on the north rim can be hard to come by. The final option, and the one I recommend, is to spend the night before you start in Page, Kanab, or Jacob Lake and leave your car on the north rim. Start your last day of hiking (from Indian Garden to the south rim) early and you can easily catch the 1pm shuttle back to your car at the north rim.
Weather and When To Hike – The biggest consideration when doing a rim to rim hike is the road to the north rim. The north rim is pretty high and gets quite a bit of snow in the winter. The park generally tries to open the road by May 15th but it can be delayed if the previous winter had lots of snow. Conversely, the park closes the road in the fall as soon as the snow starts falling. Exactly when the road will close is impossible to predict. Officially the park says Dec. 1st but it can be sooner. Services on the North Rim close Oct. 15th. Which means your window is May 15th to probably sometime in November.
Whenever you start, expect widely varying temperatures on your hike. In May, October, and November temps on the rims are usually moderate (highs in the 60s – 80s) and warm to hot at the bottom (70s – 90s). From late May into late September the rims are generally pleasant but expect heat down below. Highs in the inner canyon are usually over 100, sometimes well over 100. It can be dangerous, even fatal, to hike during the day when it’s that hot.
My recommendation is to do this hike in October or early November. This avoids the heat of the summer. Mid-May usually has good weather too but the first weekend the north rim is open brings hordes of rim to rim day hikers. You’ll have lots of company on the trail. By late May you’re risking high heat at the bottom.
That isn’t to say this hike can’t be done in the heat of summer. There is water available along most of the route and the campgrounds provide ample shade. But you’ll definitely want to hike smart. The key is to hike very early. You want to be leaving camp at or before first light. Notice I didn’t say get up at first light. You want to be on the trail by first light.
Water – One of the real treats of this hike is the amount of water available. Normally there is potable water at (from north to south) Supai Tunnel, Manzanita Rest Area, Cottonwood Campground, Phantom Ranch, Bright Angel Campground, Indian Garden, Three Mile Resthouse, and 1.5 Mile Resthouse. Note these water sources are often closed, either for winter season, pipe breaks, maintenance, or whatever. Check ahead.
More useful and more reliable is Bright Angel Creek. You pick up this lovely and reliable creek late on day 1 and hike alongside it all of day 2. It’s a great place to cool off, soak your shirt, or tank up on water. In addition, on day 3 you encounter Pipe Creek (somewhat reliable) and Garden Creek (reliable in all but very dry years). As always in the backcountry bring a method to treat water before drinking.
Bathrooms – The Rim To Rim is a well traveled route. You’ll have plenty of company. But that means the Park Service has installed plenty of bathrooms along the way. Starting from the North Rim there are bathrooms at Supai Tunnel (mile 1.7), Manzanita Rest Area (mile 5.4) and the Cottonwood campground (mile 6.8), all on Day 1. Day 2 offer a (pretty nice) bathrooms at Bright Angel campground (mile 14). Day 3 is Pipe Creek Beach (mile 15.5) and Indian Garden (mile 18.5). Finally, Day 4 offers bathrooms at 3 Mile House (mile 20.0) and 1.5 Mile House (mile 21.5).
With the exception of Bright Angel campground all these bathrooms are pit toilets. However, the Grand Canyon composting toilets are some of the nicest pit toilets you’ll ever use. You can even throw leftover food in them. The Bright Angel campground bathrooms are full-on flush toilets with running water sinks.
Permits – The Rim to Rim Permit is a difficult one to get. Most Grand Canyon permits are tough but Rim to Rim is particularly difficult. For tips and tricks on how to have the best chance of success, visit my Grand Canyon Backcountry Logistics page.
The Route
Day 1
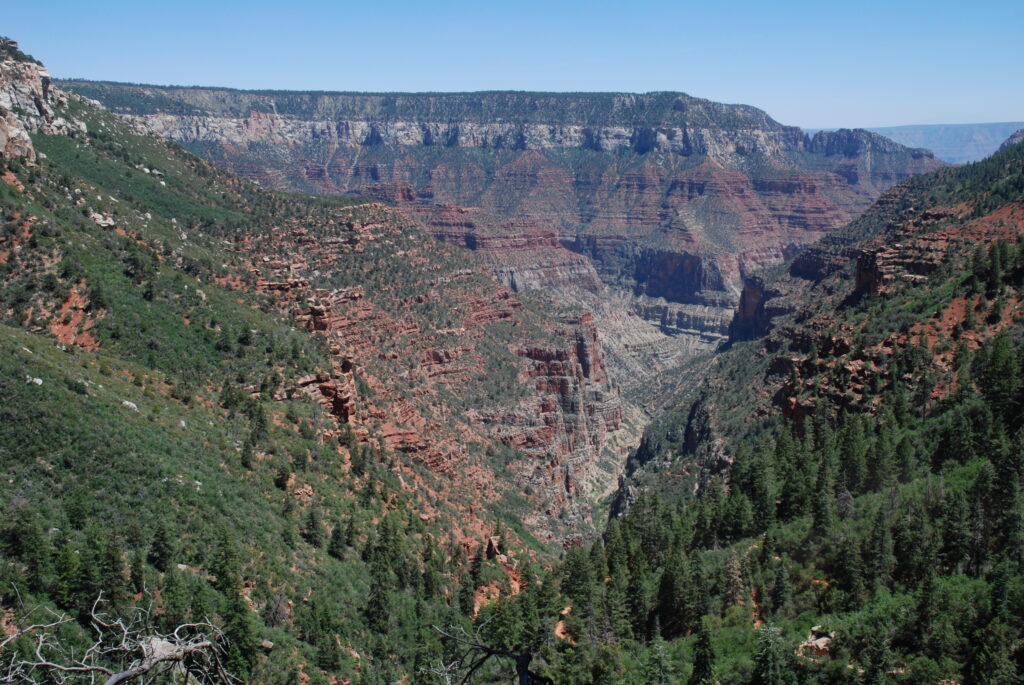
The North Kaibab Trail starts steeply downhill immediately and doesn’t relent for the first several miles. It’s called the Grand Canyon for a reason and you’re headed to the bottom. Mules use this upper part of the trail so expect thick sand and dust (and mule droppings) as you descend through the Kaibab, Toroweap, and Coconino layers. This first part of the trail is deep in Roaring Springs Canyon so, by Grand Canyon standards, the views actually aren’t all that great. Still, be sure to stop for a nice photo op at the Coconino Overlook (mile 0.65). After the overlook another mile brings you to a nice rest stop, bathrooms, and (usually) water at the Supai Tunnel.
The Tunnel is where the mule trips turn around so the trail conditions improve greatly afterward. Unfortunately it doesn’t get any less steep for a while. You descend another 850 vertical feet through the Redwall layer and cross a footbridge before coming to the most dramatic part of the day’s hike, a short section carved out of a vertical cliff in the Redwall. This section is only a few feet wide with a vertical wall rising to your right and a sheer drop of hundreds of feet on your left.
After completing the narrow part you have another 800 vertical feet to descend over about a mile before your knees get a break as you reach Bright Angel Creek. During the descent you’ll have Roaring Springs across the canyon as company. This large spring is a major contributor to Bright Angel Creek and provides most of the water for Grand Canyon National Park. The pipe bringing this water to the South Rim will be your companion for most of the rest of the hike. You’ll also notice Bright Angel Canyon coming in from the left. Once alongside Bright Angel Creek you quickly cross a footbridge. From here there’s only an easy (and mercifully flat) 1.25 miles to Cottonwood Campground, probably your stop for the first night. My favorite camp sites here are the first ones you encounter. They have a little more privacy.There are sites closer to the bathrooms and water further up the trail but those are pretty close together.
Day 2
Day 2 provides a welcome rest for your knees after the huge descent on Day 1. Start the day by heading south out of the campground down a gentle descent on a fairly nice trail. Bright Angel Canyon is fairly wide here so, despite being over 4,000 feet deep in the Grand Canyon, you have expansive views of the canyon walls here, and even occasional views all the way to the South Rim. After 1.1 miles of very pleasant walking don’t miss the first of 2 must-do side hikes on this trip: Rainbow Falls. Turn right at the well-marked trail junction, cross the footbridge, and follow the trail about 0.3 miles into a large alcove. The trail gets a little rough and brush-choked near the end but not too bad. Just keep working your way up the little outlet stream. Soon you’ll be at the base of one of the prettiest waterfalls you’ve ever seen.
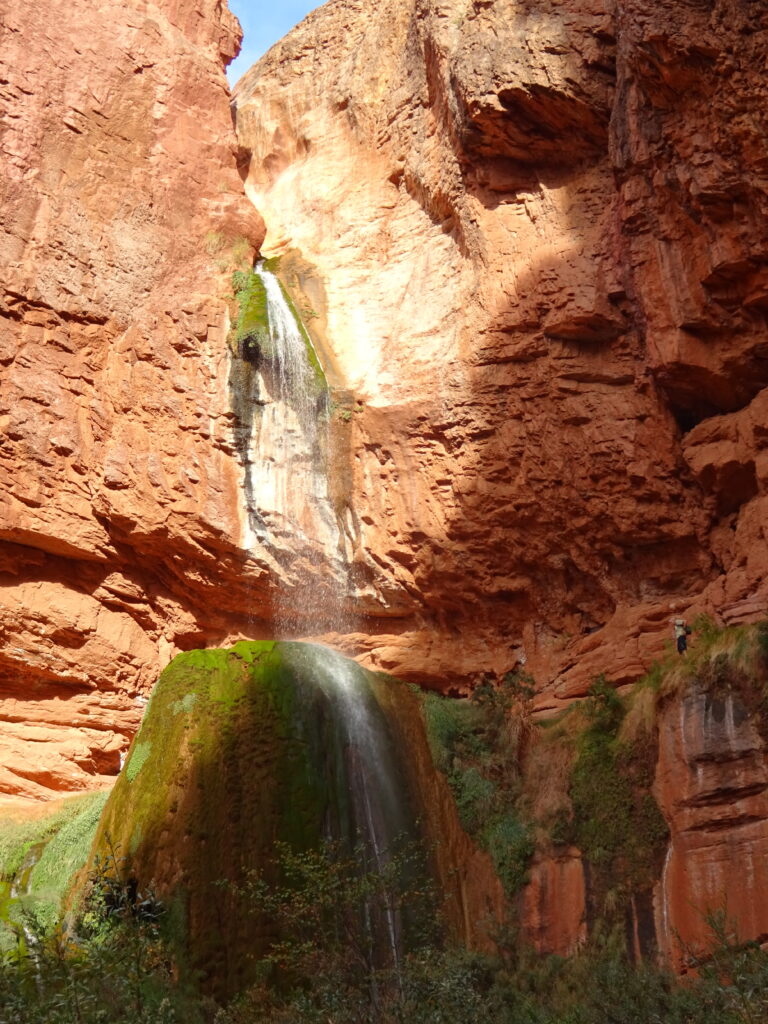
Take some time here to enjoy the fall. You can get up behind the upper tier of the fall by working your way up on the left side of the alcove. Or you can crawl into the little cave behind the fall. There’s plenty of room in there and you can climb up the left side of the cave to stick your head out of the little hole about 8 feet up. There are handholds to allow you to get high enough but be careful, it’s very wet and slippery in there. And plan on getting very wet going in the mouth of the cave. Note that, as of 2020, the footbridge is officially closed by the park service. It was damaged by a flash flood a few years earlier. You can climb down the creek bank here but there’s a slightly longer but easier way. Just continue south along the North Kaibab trail another 0.4 miles past the first trail junction to a second Rainbow Falls trail. It’s at the base of the short, steep descent. You have to cross Bright Angel Creek on this trail but it’s an easy crossing unless the creek is very high. From this side it’s also about 0.3 miles to the fall.
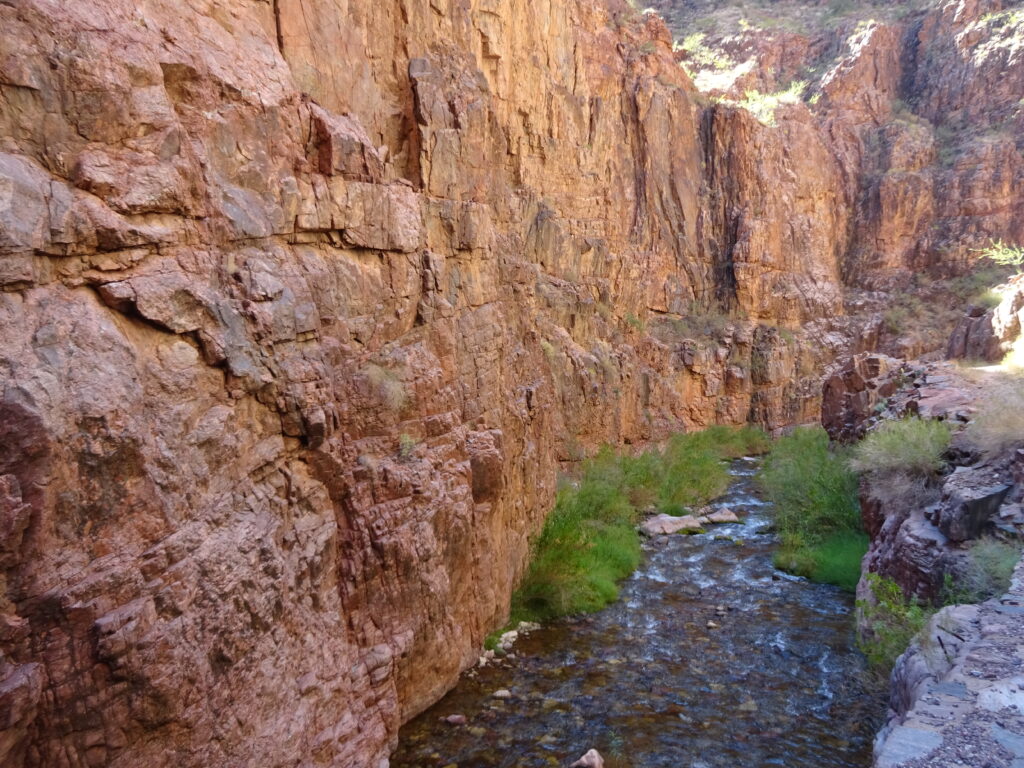
After enjoying the fall return to the North Kaibab by either route. Turn right to continue south toward Phantom Ranch and the river. As you slowly descend down this portion of the trail the walls of Bright Angel Canyon slowly narrow until you enter an area called The Box. Here you enter the Basement Layer of the Grand Canyon, 1.2 to 1.8 billion year old schist, granite, and gneiss that make up the lowest layer of the canyon (and of the continent).
The trail is squeezed right up next to Bright Angel Creek by the walls of the canyon in The Box so for the rest of the hike to Phantom it’s right next to you. The trail crosses the creek 4 times on very good foot bridges along this 3.5 mile stretch. Just under 2 miles from the 2nd bridge (and about 1/3 mile before the 3rd) look for the side canyon across the creek on the right. This is Phantom Canyon. If you have the time this is a very rewarding side hike up a narrow creek-filled canyon. As with any narrow canyon in the southwest, stay out of here if there is rain in the forecast. It is prone to flash floods.
After Phantom Canyon you quickly cross the last 2 bridges and reach the end of The Box. Shortly thereafter you pass the junction with the long, remote, and spectacular Clear Creek Trail. Once past the junction you’re pretty much at Phantom Ranch. Among the first buildings you come to at Phantom is the Cantina. Here you can buy cold beer, cold lemonade, and postcards marked “Delivered By Mule From The Grand Canyon.” Once past the Cantina bear right to follow the trail right next to the creek. You will shortly come to a footbridge over the creek. Cross the bridge to enter the Bright Angel campground, normally home for night 2 of the Rim To Rim. When choosing a site I prefer the larger and more shaded sites on the right side of the trail (away from the creek) but the smaller sites on the creek side can be lovely as well. Try to pick a site away from the bathrooms. They can be quite noisy all night long. Also, be very careful with your packs here. The critters are very aggressive going after food, not to mention the rangers who are very aggressive at writing tickets. If you leave anything with an odor in a pack you are likely to get your pack chewed up and/or a nice fine. Put everything in the food box as soon as you arrive.
Day 3
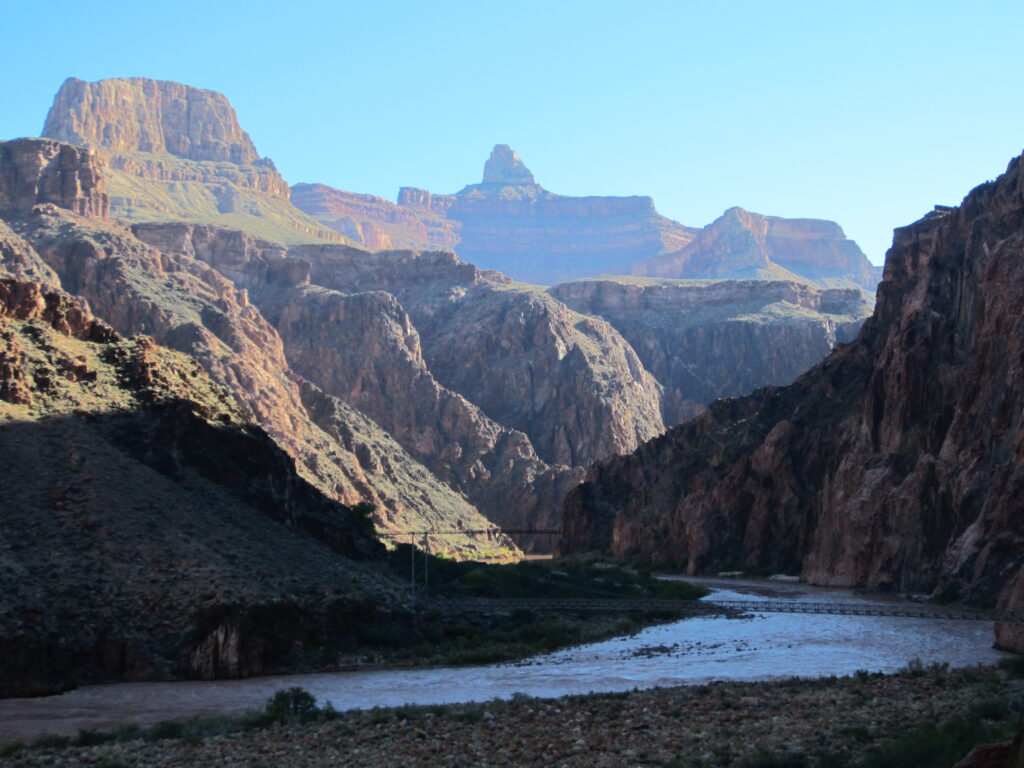
To start Day 3 simply continue down the campground trail past the bathrooms. You’ll pass the 2 large group campsites then a short section under an overhanging cliff where a sign advises you not to stop due to rockfall danger. Turn right at the junction and follow the trail to the Silver Bridge. This is the older of the 2 footbridges over the Colorado. The slightly newer Black Bridge is to your left as your crossing the bridge, just upstream on the South Kaibab trail. After crossing the bridge turn right and follow the River Trail for about a mile downstream. This is a lovely section of trail, especially early in the morning. The trail rises above the river offering beautiful views of the Colorado making its way to the Sea of Cortez over 1,000 miles downstream.. Take some time to watch the water wind its way through the rocks. You may also see raft trips making their way through the canyon.
All too soon the easy portion along the river ends and the trail turns right to start heading up the hill. The turn happens just above Pipe Beach, where raft trips often stop to change over passengers. There’s also an OK bathroom here of you need it. Note this is also where the Bright Angel Trail, your home for the next 2 days, officially begins. Hopefully you enjoyed the flat sections along the River Trail because there pretty much aren’t any more for the rest of the hike. The trail starts gradually up into Pipe Creek Canyon. I like the rock in this canyon. It’s more of the basement layer; the gneiss, schist, and granite that make up the bottom layer of the Grand Canyon. It looks prehistoric, and it is. Some of this rock was already a billion years old when the first animals crawled out of the ocean to colonize land.
The first mile of the hike up through Pipe Creek Canyon is very pleasant. The trail isn’t too steep and Pipe Creek is often babbling away next to you (don’t rely on it for drinking water, though. It’s often dry). However, after this first mile you enter a section called The Devil’s Corkscrew. This is a steep section of switchbacks and rising traverses that will definitely get you breathing hard. The good news is it’s only about 3/4 of a mile. You’ll know you’ve reached the summit when you cross over a low ridge into the next drainage to the west. Here the grade lessens considerably making the rest of the hike to Indian Garden very pleasant.
You quickly pick up Garden Creek (almost always running to some degree) on your right as you ascend. Follow it up through the canyon until you come to a large cliff on your left. This is the Tapeats Narrows, and it’s a great place to take an extended break. Garden Creek is just on the other side of the trail and there’s a nice side hike opportunity. Look for a foot path that leaves the main trail on the right to drop down and cross Garden Creek. This trail leads to a small ruin less than a quarter mile away. I’m not entirely sure the Park Service wants people exploring this small granary but there are no signs saying don’t so I’m writing about it. It’s a small Ancestral Puebloan granary tucked in under the overhanging Tapeats Sandstone. These little food storage boxes, constructed generally 700-1200 years ago, dot the landscape all over the Southwest. Soon after the Narrows you reach the junction with the Tonto Trail East. The Tonto is a wondrous trail stretching almost 100 miles along the Tonto Platform, the relatively flat platform upon which you are standing at this point. Here at the junction with the Bright Angel trail you are roughly at the mid-point of its 100 mile length.
About a half mile past the Narrows you come to you’re home for the last night of the trip: Indian Garden. To get to the camp sites go past the mule tie-ups and the water fountain and take a right. Take a look at the gigantic cottonwood stumps here. Unfortunately these trees had to be cut down in 2019. They provided fantastic shade but, as you can see from the stumps, they were very old and rotting inside. Follow the trail through the huge reeds up to the campground. My favorite sites are the ones furthest up past the water fountains and information board.
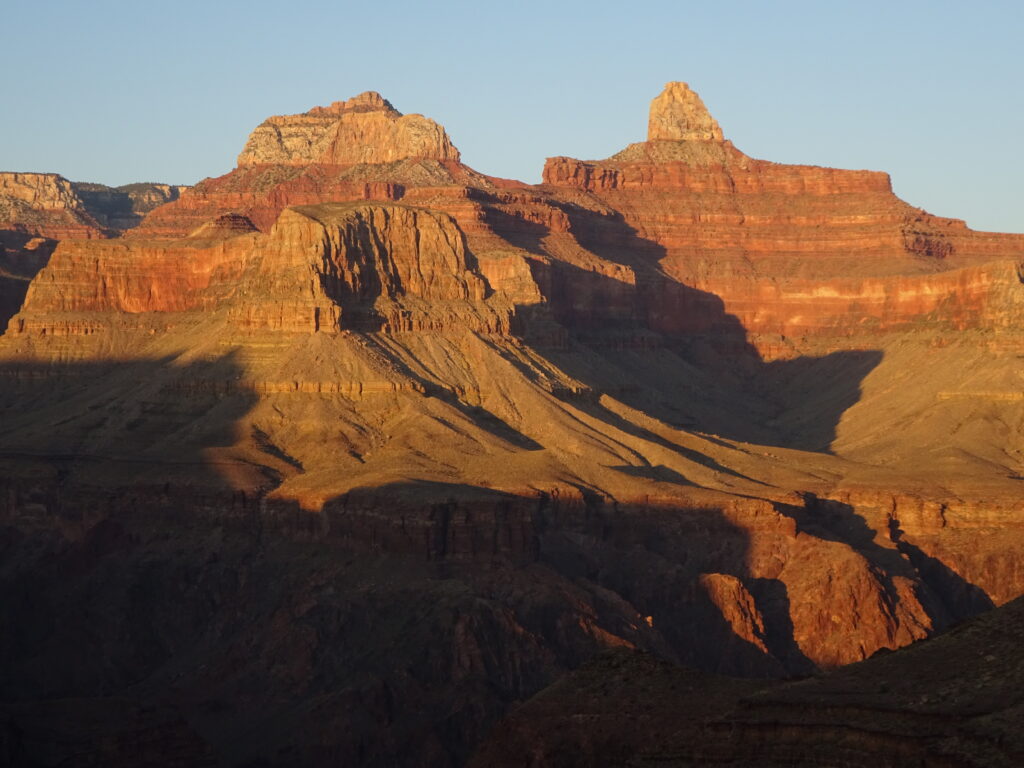
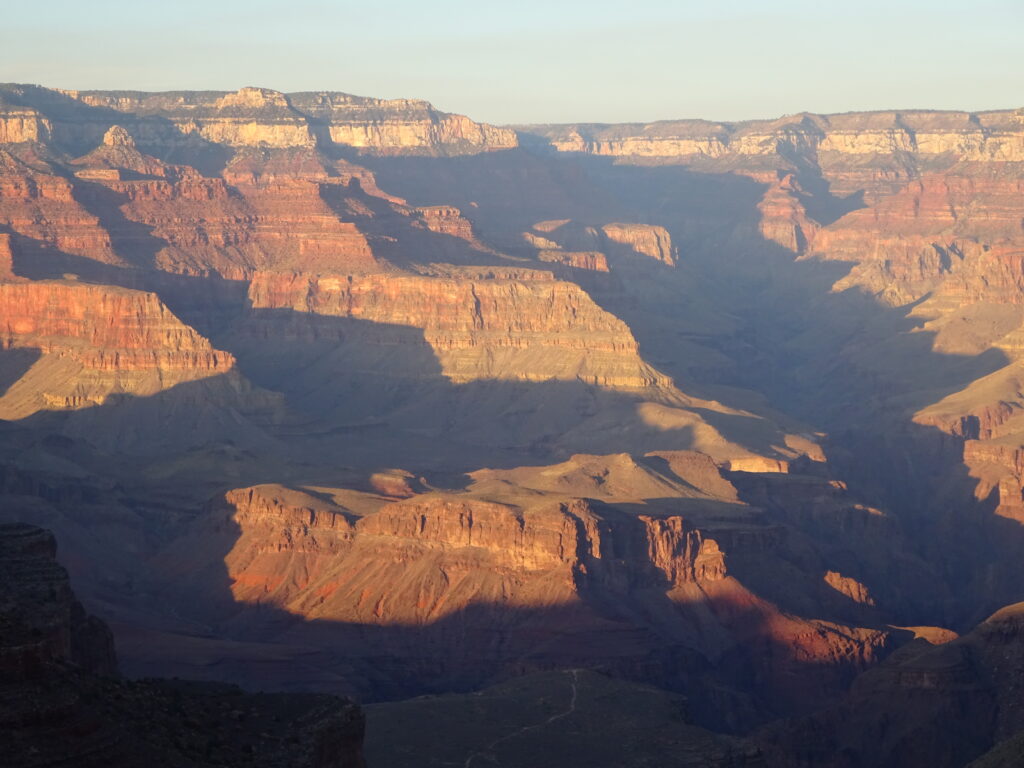
After you set up camp (and maybe take a nap) I urge you to head out to Plateau Point for sunset. This is another of the highlights of the trip. You won’t soon forget watching the colors change on Zoroaster and Brahma Temples as the sun goes down. If the sunset is late enough I’ll sometimes bring the cooking gear and do dinner out there. The hike is a very easy 1.5 miles out to a spectacular viewpoint above the Colorado River. The views of the river are just the start of the show, though. From Plateau Point you have a 360 degree view north to Zoroaster Temple, Cheops Pyramid, and the North Rim; to the east many miles upriver to Wotan’s Throne: west downriver to Temple of Set, Tower of Ra, and the Powell Plateau; and south to the South Rim. Look for the Bright Angel Trail climbing up to the South Rim in the furthest back recess you can see to the south. To get there, retrace your steps back to the mule tie-ups, cross Garden Creek, and turn right. Note the junction with the Tonto Trail West about half way to the point.
Day 4
Well this is the day you’ve been either looking forward to or dreading. From Indian Garden it is 3,000 feet straight up the side of the canyon in about 4.5 miles. The good news is that the trail is extremely well designed. The switchbacks are never horribly steep and the trail is wide and not too rough. This is by far the easiest (easiest, but not easy) way up out of the canyon.
To start up the hill follow the trail through the campground up the hill toward the South Rim. You’ll quickly reach a junction near the Ranger Station. Turn left then quickly turn right onto the main Bright Angel Trail. At first the Bright Angel Trail rises very slowly as you leave Indian Garden. Keep an eye out for desert bighorns along this stretch of trail. They can often be seen grazing on the (relatively) abundant grass here. Pretty soon, though, the trail reaches the canyon wall, turns right, and starts up the hill. From here to the top the climb is never too steep but it’s unrelenting. A series of switchbacks brings you up through the Redwall Limestone to 3-Mile Resthouse, the first of 2 resthouses on the trail. Here you will find pretty nice pit toilets drinkable water spring through fall. The NPS shuts down this water source if there is any frost danger (and the pipe breaks pretty often) so make sure you know its status. The information boards at Bright Angel campground and Indian Garden will always tell you.
From 3-Mile House the trail switchbacks up through the Supai Group. The Supai is really thick here so you’re in it pretty much all the way to 1.5 Mile Resthouse. 1.5 Mile Resthouse, like 3-Mile House below it, offers pit toilets and water, again the water assuming the pipe isn’t shut off or broken. Above 1.5 Mile Resthouse comes what is to me the most grueling part of the day: Jacob’s Ladder. Jacob’s Ladder is a series of short, steep switchbacks which wind up through the Coconino layer. Take this section slowly. It’ll look like you’re almost done but you’re not. At the top of the ladder you pass through the lower tunnel, round a corner and see that you still have a couple long climbing traverses before you hit the top. Just before you reach the top, and before the upper tunnel, look up to the right to see a series of Ancestral Puebloan pictographs. Hundreds of people walk by these 800 – 1200 year old pictographs every day without even noticing them but I find them pretty impressive. I like to picture the people who sat here in ancient times drawing these figures. From the upper tunnel and pictographs you’re only steps from the top. At the last junction don’t turn left, continue straight ahead. Once you hit the top continue straight ahead for a great photo op at the big rock with Bright Angel Trailhead engraved on it.
That’s it! You did the Grand Canyon Rim To Rim. If you enjoyed this hike (and how could you not?), I encourage you to look into something a little more remote in the canyon. Consider the Hermit, Grandview, or Tanner Trails. On these routes you leave behind the picnic tables, water pipes, and people to truly experience the Grand Canyon wilderness.