The Yosemite Valley North Rim Traverse
The North Rim Traverse is a fantastic early season option in Yosemite. Expect vertigo-inducing views of Yosemite Valley and Half Dome, pristine forests, idyllic mountain streams, and an up close and personal view of the highest waterfall in North America. The itinerary here outlines doing the hike in 3 days but consider 4. There are a couple great side hike options, detailed below, that make for a nice layover day. You can do the hike either direction but I prefer west to east.
| Miles | Elevation | Hours | |
| Day 1 | 3.7 | +3300/-550 | 3-4 |
| Day 2 | 8.3 | +2738/-2715 | 6-8 |
| Day 3 | 4.9 | +252/-3043 | 3-4 |
| Eagle Peak Day Hike | 6.25 | +1518/-523 | 3-4 |
| Mt. Watkins Day Hike | 7.6 | +1772/-48 | 4-5 |
Logistics
The Trailhead – The hike starts at the Yosemite Falls trailhead located behind Camp 4 in Yosemite Valley. From the shuttle bus stop walk across North Side Drive and to the back of the Camp 4 parking lot. The Yosemite Falls Trail intersects the Valley Loop Trail just a few yards behind the parking lot.
Traffic and Parking – There are only 2 good places to park overnight in Yosemite Valley if you’re not staying in the valley: the dirt lot near Curry Village and the lot between Curry Village and Happy Isles called Trailhead parking. Both lots are nicely close to the end of this hike so park here then walk or take the shuttle bus to the Upper Yosemite Falls trailhead (shuttle stop 7) to start your hike. Both these lots tend to fill early so plan to arrive before 9am to make sure you get a space. Get there even earlier in high season from mid-June to mid-August. The Curry Village lot also tends to have spaces after about 3 or 4 pm. Wherever you park, make sure store anything with an odor in the nearby bear lockers.
Weather and When To Hike – This is best done as an early season hike (late April to early June) for 3 reasons. First, the climb on day 1 starts at a relatively low elevation and has stretches with no shade. In summer it can be brutally hot. Second, Yosemite Falls tends to run very high in the spring but dries out quickly. In dry years it can be either a trickle or completely gone by mid-summer. Finally, with the exception of Snow Creek the water sources on this hike can disappear by mid to late summer.
Permits – This hike can be done either direction, starting from the Yosemite Falls trail or the Snow Creek trail. I prefer starting at Yosemite Falls but the Snow Creek permit is generally easier to get and it really doesn’t make much of a difference. For detailed information on getting Yosemite wilderness permits, click here.
Map
The Route
Day 1
This hike starts going steeply uphill immediately with little let up. You’ll ascend 1000 feet in the first 0.9 miles over a series of very well maintained switchbacks. This brings you to Columbia Rock, a great place for your first break with a stunning view of the valley floor and Half Dome. From here there’s a steep sandy climb (brutal in hot weather) to the only relatively flat section of the trail. This all too brief section ends as you round a corner to a full on view of 1500 foot tall Upper Yosemite Falls. Stop here for a few minutes to enjoy the best view of Upper Yosemite Fall to be had anywhere in the park.
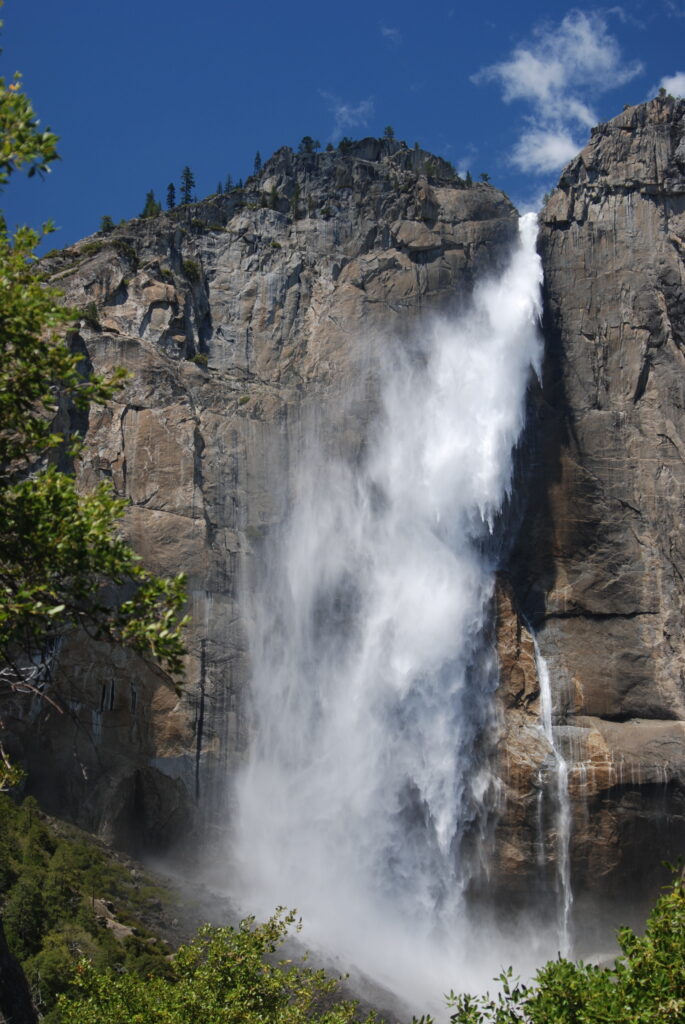
From here the trail brings you even closer to the fall for more dramatic views. Keep an eye out to the right as you ascend for sneak peeks of the fall from the side. This part is pretty grueling. Prepare to ascend a little over 1,500 feet in just 1.1 miles. Fortunately there are great places to take a breather where the fall pops into view. You may even get a little wet from the fall depending on the time of year and water flow in Yosemite Creek. As you near the top, though, the fall disappears from view and it’s just a long steep slog.
The top comes rather suddenly. You’ll know you’re there when you hit the signed trail junction. Here you have a couple camping options, either straight ahead or to the right. If you go straight there are decent campsites between the trail and Yosemite Creek starting about a half mile further up the trail. Make sure to camp at least 100 feet from the trail and 100 feet from the creek. If you turn right the camp sites are a little further away but this trail takes you to the viewpoint above the top of Yosemite Falls. To see the top of the falls turn right at the junction then right again just a few hundred yards later. Follow the trail to the edge of the cliff then look for the stone stairs leading down to the left. After viewing the falls return to the main trail, turn right, and cross Yosemite Creek on the footbridge. Continue along the trail until it turns right to go up the hill. Here leave the trail and continue upstream parallel to Yosemite Creek. There are several decent camp sites in this open area.
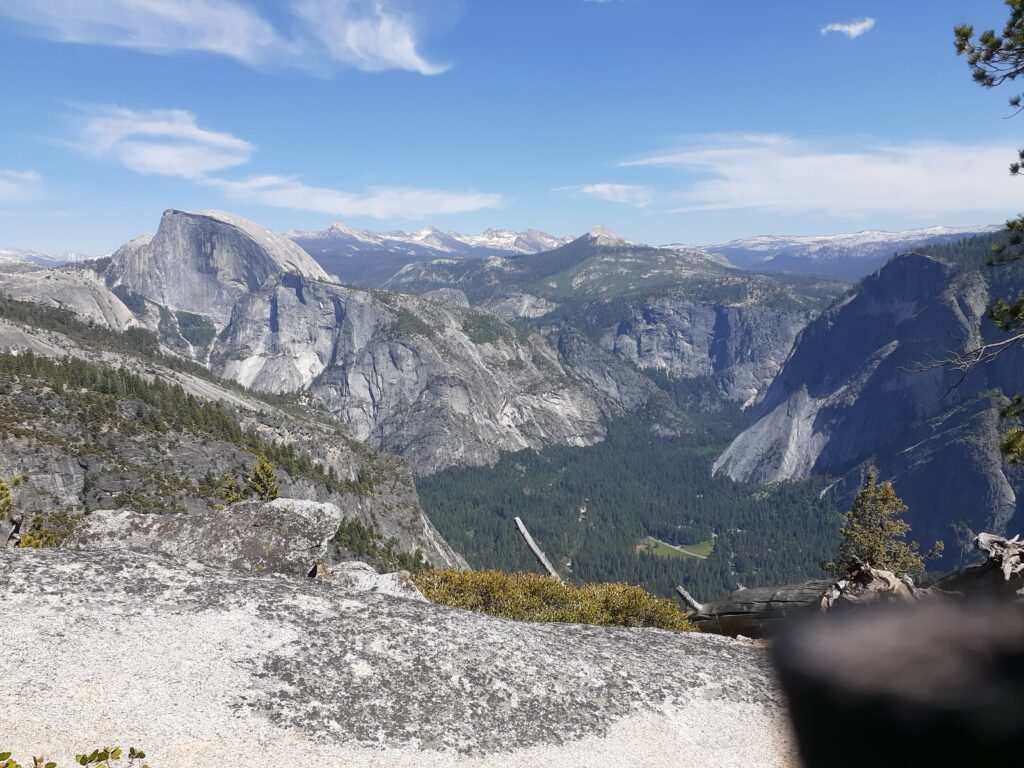
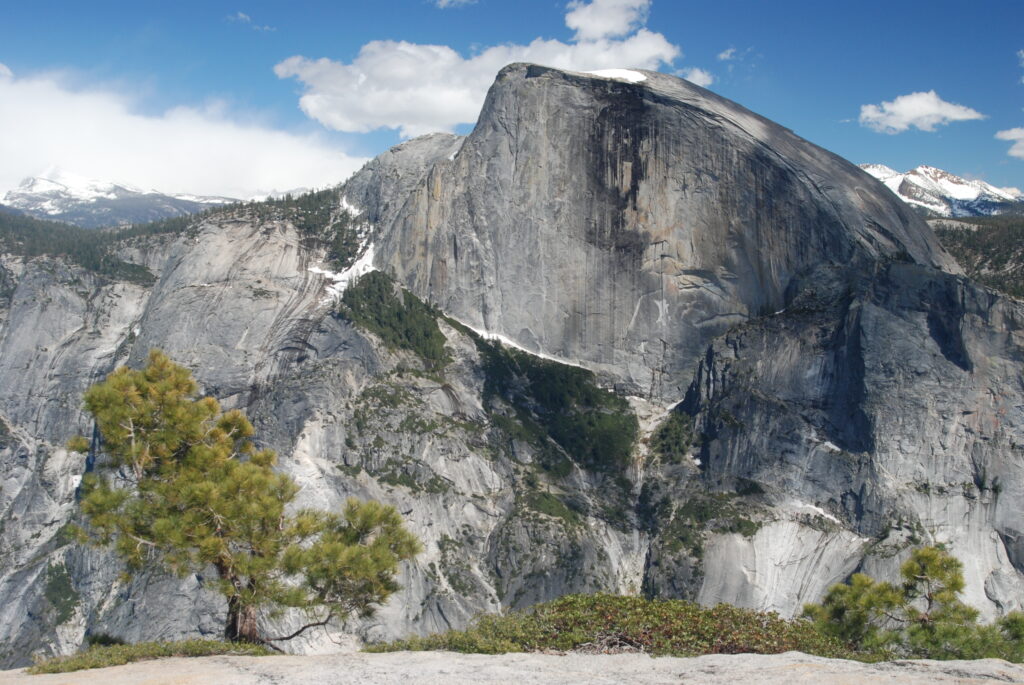
If you decide to do a layover day here the day hike I recommend is Eagle Peak. It’s a lovely hike to a dramatic view of Yosemite Valley and the High Sierra Peaks beyond. To hike to Eagle Peak, assuming you crossed Yosemite Creek to camp the night before, cross the footbridge and retrace your steps back to the top of the Yosemite Falls trail. Turn right and climb the hill parallel to Yosemite Creek. If you stayed on the west side of Yosemite Creek the night before you’re already there. Six tenths of a mile up from the top of the Yosemite Falls trail you come to the Eagle Peak/El Capitan trail junction. Turn left. The trail climbs a little steeply for another 400 feet in half a mile then levels out. Soon you come to a section that can be very swampy early in wet years. About a mile past the swamp is the intersection with the short spur trail up to Eagle Peak. Again turn left. Continue up the sometimes steep spur trail until you come to a sublime view of Half Dome and the peaks beyond on your left. Continue past the viewpoint, staying right, You’ll quickly come to a short scramble up a granite ledge before reaching the top. Spend some time here enjoying the views of the valley, Glacier Point, Half Dome, and the High Sierra.
From the Eagle Peak junction the trail continues on another 1.9 miles to the top of El Capitan. While the name El Capitan tempts many people to make the trek out there I actually don’t recommend it. Unless you are particularly interested in El Cap (and lots of people are), your time is better spent elsewhere. The view from the top is nowhere near as good as Eagle Peak and it’s difficult to get a good view from the top straight down the cliff face. The top kind of gradually gets steeper until you hit the edge, and most people back off before they get to the edge. If you love El Cap, approach it from the base and look up.
Day 2
If you camped on the west side of Yosemite Creek, start day 2 by crossing back over Yosemite Creek on the footbridge. If you camped on the east side just retrace your steps back to the trail. From the footbridge the trail works its way up the large open hillside above the creek before entering a small but lovely forest. When you exit this grove the trail continues up to the left but keep going straight ahead to a lovely viewpoint called Yosemite Point. You can’t see the fall from here but the views of Half Dome, the Clark Range, and Yosemite Valley from here are exceptional.
When you’re done enjoying the view turn around and head up the hill along the cliff edge. The trail is a little faint here but just keep going up. You’ll see it. Keep an eye out to the right. There are some great cliff photo ops along the edge here. Eventually the cliff moves away from the trail though and you find yourself in another lovely forest grove, including some huge old sugar pines (note the enormous pine cones all over the ground).
Shortly after you enter the trees the trail tops out and begins a long slow descent to Indian Canyon Creek. Except late in dry years you should be able to count on water in this creek. If you stop to fill up, take a minute to ponder the history of this place. When the Native American residents of Yosemite Valley were chased by the first Europeans to enter the valley, they escaped into the high country up this creek. They were eventually captured near Tenaya Lake (named for their chief, ironic) and forced onto a reservation in the Central Valley.
After the creek the trail rises a little up out of Indian Canyon Creek, traverses a short flat area, then begins to descend to Lehamatie Creek. Unlike the previous creek, don’t count on this one for water except earlier in the season. Just before the creek you’ll come to a junction and have a decision to make. Turning left takes you the short way to your destination for the night, Snow Creek, in about 4.1 miles. However, the short route skips North Dome, one of the best viewpoints in the park. Continuing straight takes you to North Dome but adds 2.4 miles to the hike. If you have the time and energy I highly recommend taking the longer route and seeing North Dome. It’s a great spot.
Assuming you’re headed to North Dome continue straight through the intersection. You’ll quickly cross Lehamitie Creek and climb a small hill. After about a mile of lovely walking through a mixed conifer forest you’ll climb up onto an open granite slab with great views of North Dome and across Yosemite Valley. Look for the junction with the spur trail out onto North Dome about 1/4 mile after you get up on the granite. Dump your packs here (make sure to take out your bear cans and any other smellables) and turn right to head down onto North Dome.
The short spur trail out onto North Dome leads down off the granite slab you’re on, across a small forested saddle, then up onto the dome itself. Take some time at the top to enjoy the unrivaled view of Half Dome, Cloud’s Rest and Yosemite Valley. When you’re done gawking at the view retrace your steps back up to the trail junction and retrieve your packs.
From here the trail continues up the open granite slab north/northeast toward the forest. As always on granite keep a close eye out for footprints and look for cairns marking the route. The trail is a little vague here. About 1/4 mile past the North Dome junction make sure you keep right to go into the trees. Don’t continue straight up the slab to where it gets very steep. There’s a dike in the granite that looks like a trail that continues straight ahead but the trail veers right into the trees. From there it’s less than a mile to the Indian Rock Arch trail junction (worth the 1.2 mile round trip side hike if you have the time).
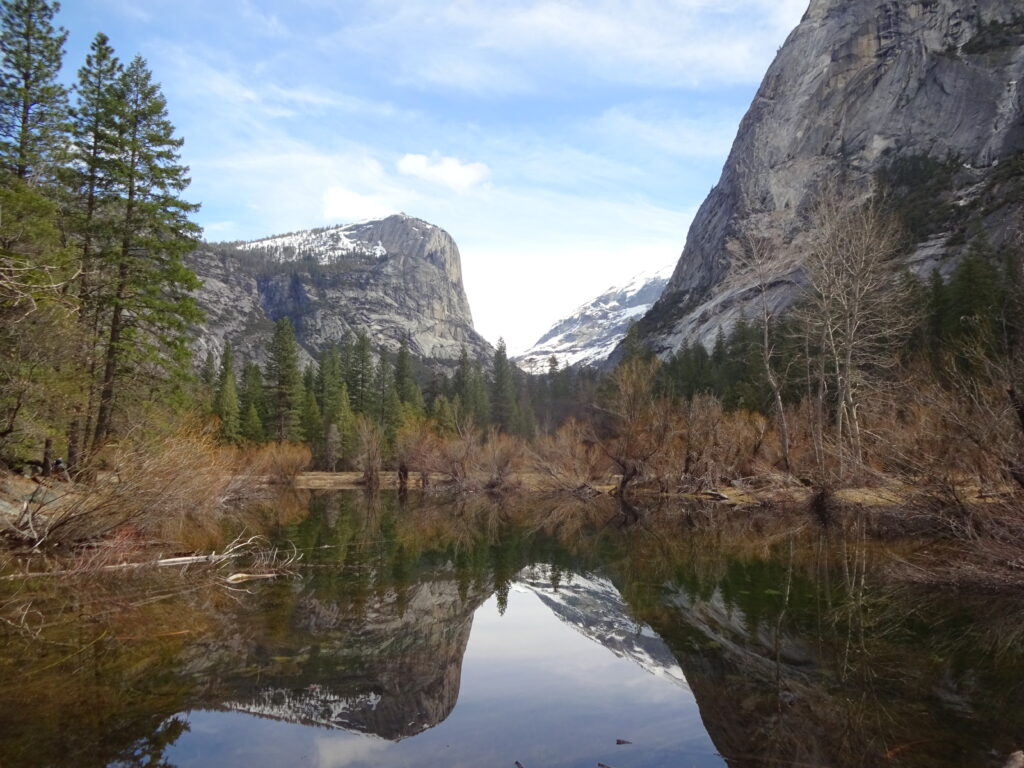
From the Indian Rock junction it’s an easy mile of downhill walking to your last junction of the day. This one can be a little confusing. There are actually 2 junctions about 100 feet apart. At the first junction continue straight ahead. Note that if you skipped North Dome this is where you regain the route. The North Dome bypass trail comes in from the left. At the second junction veer right toward Yosemite Valley. Follow this trail 2.6 miles down to your destination for the evening: Snow Creek Falls.
When you reach the trail junction next to the creek, turn left and cross the footbridge. There are some great camp sites on the west side of the river but, as of 2020, they are still closed thanks to our old friend the Snow Creek bear. The bear is an old female that has developed the annoying habit of throwing bear cans off the nearby cliff where they break open when they hit the bottom. She then climbs down and helps herself to the contents. Fortunately she isn’t good at getting bear cans to the cliff so only the camp sites right by the cliff are closed. This means pretty much all the decent camp sites to the west of the creek and the sites right next to the cliff on the east side are closed. Fortunately there are some nice sites just to the right of the trail immediately after you cross the bridge. If you aren’t sure, check the maps hanging on all the trail junction signs in the area. And make sure to stack pots or something noisy on top of your bear cans at night. If the old lady goes after your cans you want to wake up and scare her away.
Take some time to poke around this area. There’s some great stuff to see. Walk just a few hundred yards toward the cliff for a terrific view of Half Dome and Cloud’s Rest. Even better, cross back over the bridge and work your way out to the cliff for a stunning view of Half Dome, Cloud’s Rest, and the east end of Yosemite Valley. Finally, work your way down to the creek near the cliff to find one of the best swimming holes anywhere. Look for a small waterfall dropping into a very deep pool. The hole has a big nicely sloping rock to make it easy to get into the water and a perfectly situated rock for jumping in. There’s even perfect sunning rocks just downstream and the view is awesome.. Just be careful in early season. Snow Creek Falls is just downstream.
If you do a layover day here the hike I recommend is Mount Watkins. The top of Watkins is about 3.5 miles and about 1700 vertical feet from your camp site. To get there, return to the trail on the east side of the footbridge and head away from the bridge. The trail climbs slowly at first paralleling the creek then turns directly away from the creek and switchbacks steeply up. At the junction near the top of the hill turn right. Here the grade lightens up a bit but continues to climb up through a mostly lodgepole pine forest. You’ll catch glimpses of Mt. Watkins on your right but avoid the temptation to turn right and head straight up. There’s an easier way. Stay on the trail until it tops out on the ridge. Then turn around almost 180 degrees and follow the gently sloping ridge line up to the top. From the top you’ll have a massively expansive view of Cloud’s Rest directly across from you and some of the higher peaks to the east. To return to camp retrace your steps or consider heading cross-country due west down the hill. You’ll intersect the trail back to camp about a mile north of camp.
Day 3
The last day return to Yosemite Valley and your car via the Snow Creek trail. This is a short hike but it’s a knee-buster. Assuming you camped east of the creek, cross back over the footbridge and turn left at the junction. You get maybe a couple hundred yards of flat before the trail turns steeply down hill. You’ll descend 2,700 vertical feet in only 2.1 rough miles. Take your time going down this trail to rest your knees and enjoy the scenery. The view out over the east end of Yosemite Valley as you descend is breath-taking. One of the reasons it’s so good, though, is that there aren’t many trees on this trail. If it’s going to be at all warm that day you’ll want to get down early. The Snow Creek trail is notoriously hot.
When you get to the bottom and the junction with the Mirror Lake Trail turn right. Although this next stretch is very flat it can be a hot, muggy, and buggy mile from here to the Mirror Lake area. Veer left at the first junction you see to get to the Mirror Lake bathrooms. From there it’s 0.3 miles on the road to the shuttle bus stop.