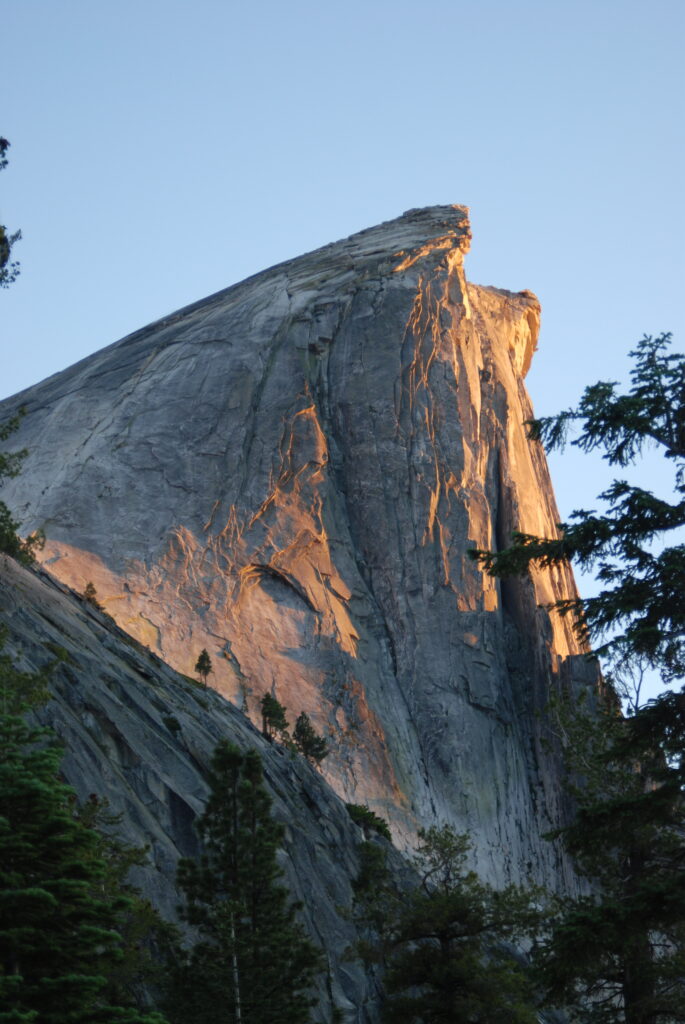
Half Dome via
a backpacking trip
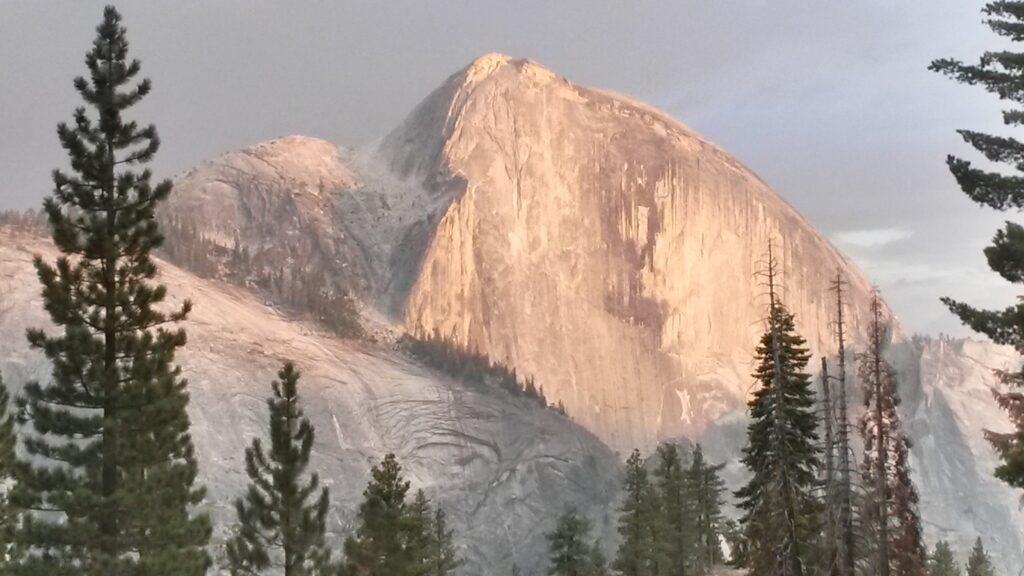
To me a backpacking trip is the way to do Half Dome. Half Dome in a day is a very long and strenuous hike. It’s hard to enjoy the journey when you have to spend that much effort putting one foot in front of the other. A backpacking trip allows a slow approach. It’s a stunning hike and you’ll want time to enjoy the view along the way. It allows time to hang out on the summit. And it allows hikers time to enjoy the process of climbing the cables.
The other big advantage is that it is much easier to get a Half Dome permit as part of a backpacking trip. Just ask for the Half Dome permit when applying for your wilderness permit. With just a little flexibility you can almost always get one.
There are a several different ways to do Half Dome as a backpacking trip. I’ve outlined my three favorite options below.
For information on permits, weather, lodging, etc. see the Yosemite logistics page.
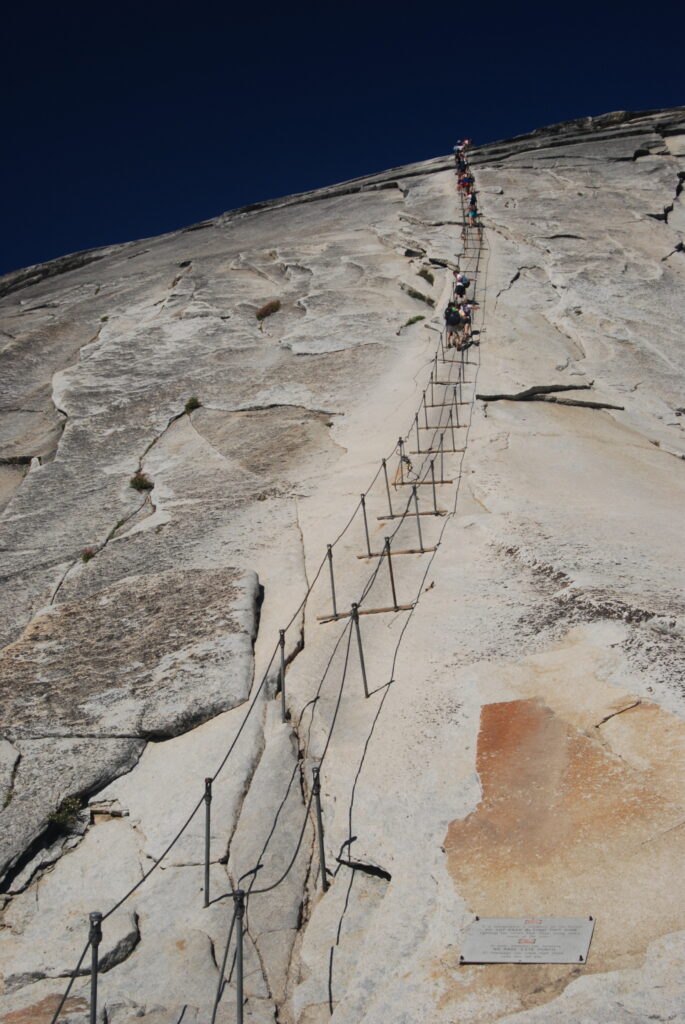
The Cables and A Word About Heights – There’s nothing quite like the Half Dome cables anywhere else in America. Climbing them is a thrilling and unique experience but they are not for everyone. The exposure when you’re on the cables is hard to imagine. On one side it’s 2,000 feet down and on the other it’s almost a vertical mile. And the rock you’re climbing with the help of the cables is steep and slick. People with a fear of heights will probably want to look elsewhere for a hike to do. Even the stone steps, the approach to the cables, can be tough for some people. That being said, with a little caution this is a pretty safe hike. Accidents are very rare. Stay inside the cables, exercise caution when passing, and don’t go when it’s wet and you’ll be fine. I’ve guided maybe 200 people up the cable and never had an incident. Although in my experience around 1 in 10 people decide not to go up once they see the cables.
Half Dome from Happy Isles
This is the shortest and most popular option. I’d try for this permit first. The approach to Little Yosemite Valley is along the Mist Trail, one of the park’s signature trails. You’ll have plenty of company but this trail is worth it, and I hate crowds.
The Trailhead – This option begins and ends at the Happy Isles trailhead. Happy Isles is accessible via the Valley Shuttle Service, stop #16, or by foot from Curry Village. During busy times of the year (which is pretty much any time the cables are up) the shuttle is often very difficult to use. The lines are long, the buses can be completely full and they aren’t very frequent. The signs that say they run every 10 minutes are flat out lying to you. If you are parked or staying at Curry Village you might want to just walk from there. It’s a pleasant .8 miles from the Curry Village parking lot to Happy Isles.
Traffic and Parking – There are 2 good places to park to begin the hike, Curry Village and Trailhead Parking. Trailhead parking is a little closer to the Happy Isles trailhead but is a smaller lot. It is used by backpackers and is often full. The lot at Curry Village also generally fills up but is mostly used by day-trippers. You can usually get a spot there (or on the street nearby) if you arrive before 10am (earlier on Saturdays or holidays). Please park in the dirt area leaving the paved lot for Curry Village guests. If these lots are filled you can try the large lot near Yosemite Village or grab a spot on the street further west in the valley.
Map
Half Dome from Happy Isles
The Route
| Miles | Elevation | Hours | |
| Day 1 | 4.5 | +2700/-600 | 4-6 |
| Day 2 | 6.5 | +2850/-2850 | 6-8 |
| Day 3 | 3.77 | +540/-2630 | 3-4 |
Day 1
This Half Dome route starts at the Happy Isles trailhead in the back (East end) of Yosemite Valley. From the Happy Isles shuttle stop cross the Merced River bridge (the Merced will keep you company for much of the hike) and turn right. Enjoy this last bit of flat trail with the Merced River on your right. Note the sign indicating the beginning of the John Muir Trail on your left. Just past this sign the paved trail starts uphill and pretty much stays that way to the top of Half Dome. At about the 1/2mile point, where the trail makes a sweeping left turn, look up and to the right for a distant view of seldom seen Illilouette Fall. Shorty after this, you’ll come to a bridge over the Merced. In the middle of the bridge look left for your first view of Vernal Fall. Just past the bridge there are a water fountain and restroom that may or may not be open. The water fountain generally opens in late May but the restroom has been closed for a few years due to busted pipes.
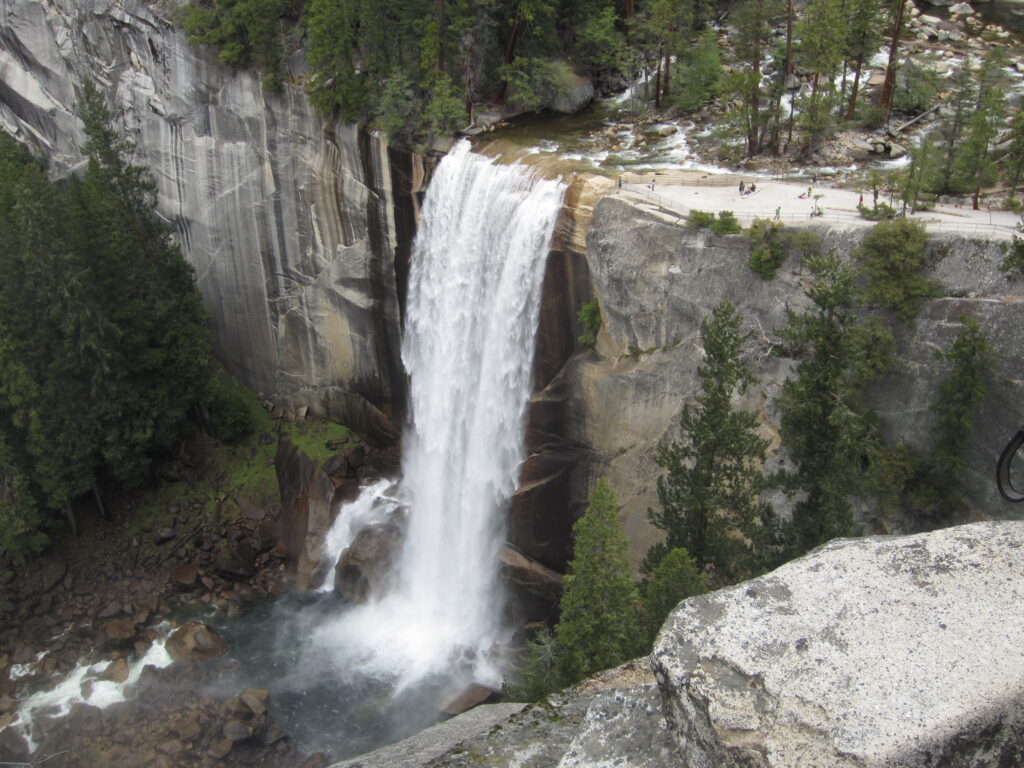
Shortly after the bridge you have a choice of routes: turn right to stay on the John Muir Trail or continue straight to take the Mist Trail. The JMT is a little longer than the Mist but is MUCH less crowded and generally drier in the spring. It switchbacks rapidly up the side of the canyon wall to Clark Point, well above the top of Vernal Fall. It’s a good option, especially if you’re hiking in the dark, but far less dramatic then the Mist Trail. The Mist Trail continues to follow the Merced upstream toward the base of Vernal Fall. Here you leave the paved trail behind for a long series of rocky steps and uneven trail carved out of the rock. The fall comes into full view now. As you ascend the 600 vertical feet of mostly stairs, depending on the flow of the river at the time, you may start to get wet from the waterfall. It’s called the Mist Trail for a reason. In May and June of wet years you can count on almost becoming one with the waterfall. Not only is the water ice cold but the trail, which is pretty much just large uneven stairs here, can also be extremely wet and slippery. Be very careful when it’s wet. The trail continues up past the right side of the fall. Stop here for an amazing photo op. There is often a rainbow in the mist at the fall’s base. Continue up the stairs to the top, turn left, squeeze between the granite wall and the railing and continue the short distance to the top of the fall. The big sunny granite slab at the top of Vernal Fall makes a great place to grab a snack, take a break, and maybe dry off. Don’t forget to take a look over the edge of the fall at the railing near the river.
When you’re ready to keep hiking, follow the edge of the river upstream just a few hundred feet or so then turn right just past the bathroom. The trail is a little indistinct here. Just make sure you are moving away from the river after the bathroom. Very shortly you reach a junction and have another route choice. Turn right to take the spur trail up to Columbia Point and rejoin the JMT. This route is a little longer but it avoids a pretty steep staircase on the Mist. If you go this way don’t miss the stunning view of Vernal Fall on the way up. Look for the short spur trail to the right about 1/4 mile past the junction to maybe the most picturesque views of a waterfall to be had in Yosemite. Then continue 1/4 mile past the viewpoint to the junction with the JMT. Take a moment to enjoy the view of Nevada Fall, Liberty Cap, Mt. Broderick, and your first good view of (the back of) Half Dome. Turn left to continue. The views of Nevada Fall get better and better as you approach the top. Eventually you cross the Merced on a footbridge right at the top of the fall. Pause here for a minute for a vertigo-inducing view of the Merced River rushing over the edge of the cliff. About 200 feet after the bridge walk up the granite slab on your left, past the large boulder, and down a few steps to an even better view off the top of the cliff.
If you prefer to instead take the Mist Trail to the top of Nevada Fall turn left after the Vernal Fall bathroom. This route crosses the Merced on a footbridge then climbs a steep, uneven, rocky staircase up the canyon wall directly beside Nevada Fall to the top of the fall. Nevada Fall thunders away just to your right as you climb. You may get a little wet here but nothing like lower down below Vernal Fall. At the top turn right to take in the view from the top of Nevada Fall, an easy couple hundred yards away. Otherwise, turn left to pass the bathroom and continue up toward Half Dome.
While both routes are fantastic hikes, my recommendation is to take the JMT on the way up and the Mist on the way down. Both routes offer dramatic views but they are very different. You really want to see them both. On the way up all the steps on the Mist can be a real knee killer. You’ll appreciate the easier grade of the JMT. Once at the top of Nevada Fall there is only one way to go. No more thinking, just one foot in front of the other.
From the bathroom at the top of the Mist the trail makes a rough but moderate climb just a few hundred feet, paralleling the Merced. From here comes what I call the merciful mile, about a mile of slight downhill and flat terrain with pretty smooth trail. After the steep rocky uphill of the Mist Trail or JMT this is a welcome respite. Veer right at the signed V in the trail. About .4 miles later you come to Little Yosemite Valley campground, your home for the next 2 nights.
Pause here for a second to get your bearings. The Little Yosemite Valley campground stretches in a rough rectangle in front of you to the left and straight ahead. The Merced River (your water source and a fantastic swimming beach) is to the right. The bathrooms are a short walk down the trail to the left. This is a first come-first served campground so feel free to pitch your tent anywhere inside the camp boundaries. My favorite sites are closer to the bathrooms. Head towards them then turn right into the campground just before you reach them. Head back into the campground and you should be able to pick a spot with a bear locker and a little separation between you and the other groups.
Day 2 – Summit Day
Note this day is the same as Day 3 of the Glacier Point/Mono Meadows option. Once you leave the LYV campground it’s all uphill. Note the sign reminding you not to forget your permit as you begin the ascent. Next is a moderate ascent of about 800 feet over 1.2 miles through a lovely mixed forest of Jeffrey pine, Ponderosa pine, incense cedar, and red fir. At the junction the John Muir Trail turns right but you’re going left. The trail continues to ascend through the forest for another 1.5 miles and 1800 feet before topping out on a ridge at the base of Half Dome proper. Take a few minutes to enjoy the expansive views of Little Yosemite Valley, Cloud’s Rest, and the Clark Range to the east ad Snow Creek Falls across Tenaya Canyon to the north.
After a few hundred yards of nice flat walking on the top of the ridge things begin to get interesting. This is where the stone steps begin (and the rangers often hang out to check permits). The stone steps are a series of about 400 stairs carved into the granite on the shoulder of Half Dome (called Sub-Dome). The stone steps are physically challenging and very exposed. You’re looking down a couple thousand feet on one side and almost a mile on the other. Many people with heights issues call it good only a short way u this section. There’s almost no shade here as well so you really don’t want to be here at mid-day on hot days. Near the top the stairs peter out so you end up walking up a steep granite slab. Just keep going up. You’re on almost a knife-edge ridge so you can’t get lost. Once you top out on Sub-Dome you’ll come face to face with the world-famous Half Dome Cables.
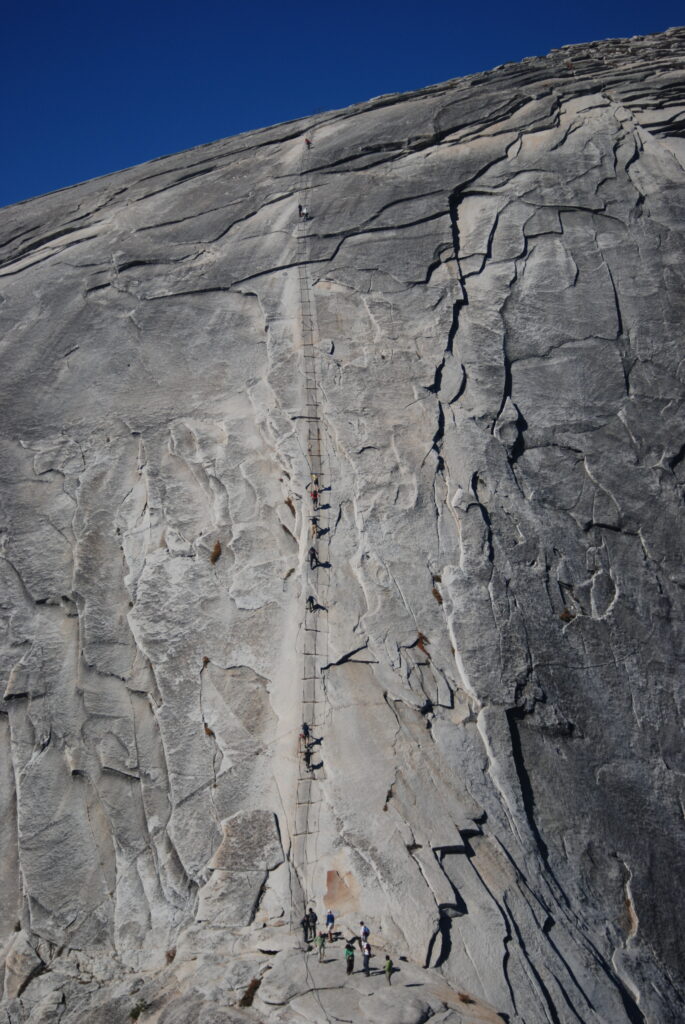
It’s time to go up the cables. You’ll want to put on your gloves and ditch your trekking poles here (stash them behind the big rock on the left). Then grab one cable in each hand and start working your way up. Only the fittest of the fit can power up the 440 vertical feet of the cables without a break so you’ll probably need a rest. The trick is to rest on the nice flat boards that stretch between the poles. Your calves will be burning if you rest too often on the steep granite between the boards. The boards are also the best place to pass other climbers, whether they’re going your direction or the other way. Communication is key. Talk to the other climbers. Let them know you want to pass, or that you’re going to let them pass. When passing, grab one cable with both hands until you’re clear. It’s pretty tight inside the cables so you want a good grip when someone goes by. Don’t be in a hurry, and DO NOT go outside the cables. And once again, if it’s wet, or if there’s lightning in the area, absolutely DO NOT GO! Climbing the cables when it’s wet or especially with a chance of lightning is a very good way to die.
When you reach the top make your way up and to the right. The best views from the top are north and east from here, across and up into Tenaya Canyon. You also get a spectacular view west into the heart of Yosemite Valley. Don’t miss the small cave out at the end of the Diving Board, the small bit of rock sticking out to the north. The cave entrance is close to the very end of the point, right at your feet. It’s much safer to climb down in there than it looks. Finally, for the best photo op, stay on the end of the point and have someone else take your pic from the top of the dome to the east. Once you’ve had your fill of the top (and don’t hurry, it’s really cool up there) retrace your steps back to the Little Yosemite Valley Campground.
It’s probably worthwhile to talk about getting back down the cables. The big choice is whether to go forwards or backwards. Lately I’ve been going down facing forwards but I’m pretty used to the cables. Going forward means you’re looking straight down into the abyss. Going down backwards gives a much more secure feeling but it can be a little awkward. The trick is to grab one cable in each hand and look at your feet as you go. Make sure to also look behind you occasionally for hikers coming up.
Day 3
To get back down to the valley retrace your steps downstream along the Merced back to the to junction near the top of Nevada Fall. If you’re following my recommended route, turn right just past the bathroom. You’ll immediately start descending down the Mist Trail stairs. The roar of Nevada Fall will become apparent immediately but it won’t come into sight until you’re about half way down. If it’s early enough in the year and the previous winter was wet enough, you may catch some spray from the fall. Be careful if the rocks are wet. hey can be very slippery.
After pounding down the steps next to the fall the trail flattens out and leads to a bridge over the Merced. After the bridge you’ll quickly be back at the junction leading up to Columbia Point and the John Muir Trail. Turn right to head back to the top of Vernal Fall. From here all that’s left is to retrace your steps back down to the valley floor. Be extra cautious going down the Mist Trail below Vernal. The descent is always a little trickier than going up.
Half Dome from Tenaya Lake
This is another great option for getting to Half Dome. It’s a point to point hike so logistics are a little trickier than the Happy Isles option. The advantage to this approach is the trail is much less crowded. It also offers the opportunity to summit Cloud’s Rest, a nearly 10,000 foot peak with an unsurpassed view of the high Sierra to to the east. Cloud’s Rest also offers a great view of the summit of Half Dome and the cables 1,000 feet below.
Logistics – While it’s possible to do this hike as an out and back, it’s not ideal. The much better way is to do it as a point to point. Done as a point to point the hike starts at the Sunrise trailhead near Tenaya Lake and ends in Yosemite Valley. To use this approach you need to either have 2 cars or take the Tuolumne Meadows hiker’s bus. If you have 2 cars, leave 1 at Curry Village and drive the other to the Sunrise trailhead. Then after your hike pick up the car you left at Curry and drive back up to Sunrise to get your other car.
The better option, however, is to leave your car in Yosemite Valley and take the hiker’s bus. This inexpensive bus leaves from 3 different places in Yosemite Valley around 8am usually beginning July 5th. It stops at several trailheads along Tioga Road including Sunrise. To check schedules and current fares, click here.
Map
The Route
| Miles | Elevation | Hours | |
| Day 1 | 3-4 | +1,000 | 2-3 |
| Day 2 | 7 – 7.4 | +1460/-3400 | 8-10 |
| Day 3 | 5.2 | +1910/-390 | 6-8 |
| Day 4 | 5.6 | +560/-3770 | 4-5 |
Day 1
From the parking lot head east, following the signs towards Cloud’s Rest. The trail quickly reaches the outlet of Tenaya Lake. This crossing can be up to waist deep early in wet years. While not swift, the water can be very cold. Camp shoes that double as water shoes can be very useful here. After the crossing the trail meanders through a lovely forest for about a mile before reaching the base of a moderately steep hill. A mile of switchbacks takes you up this 1,000 foot climb. At the top don’t miss the lovely view down Tenaya Canyon toward Half Dome. It’s up the little hill to the right (west) from the junction.
Here you have a choice. Turning left brings you quickly to lower Sunrise Lake. This little gem makes a great place for a first night camp, or even a short lunch/swim break. There’s only a couple good camp sites at lower Sunrise but you can continue on to middle or upper Sunrise Lakes as well. Both, especially upper, are lovely places to camp with great swimming and fishing opportunities.
Or, if you prefer to get in more miles on day 1, turn right at the hilltop junction and continue on towards Cloud’s Rest. A little less than a mile past the junction there is a small pond next to the trail that also makes a good campsite for the first night. It’s not as pretty as any of the Sunrise Lakes but it saves 1.5 – 2 miles of hiking on a long day 2. The water in this pond is usually pretty good except late in dry years. If it’s looking a little nasty try the outlet on the side away from the trail. After the pond the next water is almost 6 miles away so if you don’t stop here at least tank up with water.
Day 2
Whether you spent the night at one of the Sunrise Lakes or at the pond, start day 2 by continuing toward Cloud’s Rest. About a mile past the pond you’ll come to a junction and a decision. Turning right takes you up and over Cloud’s Rest. Turning left takes a more direct route down to your camp for the night (about .4 miles shorter) and saves 800 feet of ascent. Unless you’re really in a hurry, though, don’t skip Cloud’s Rest. It’s one of the best views in the park. The Cloud’s Rest Trail proceeds to the right from the junction up to the top of the ridge line. From here it follows the ridge up to the summit. The ridge line gets progressively narrower as you go up, including a section that is only a few feet wide with several thousand foot drops on both sides. Shortly past the narrow section you reach the summit of the ridge, called Cloud’s Rest. It’s easy to see how the peak got it’s name. The view from here is stunning in every direction. To the west you look down on the summit of Half Dome 1,000 feet below. If you have excellent eyesight you may be able to pick out people on the cables. To the east is a stunning view of the High Sierra including the highest peak in Yosemite, Mt Lyell, and the Lyell Glacier. Take some time here to enjoy the view.

When you’re ready, the trail continues down the Cloud’s Rest ridge opposite from where you came up. It quickly drops off the south side of the ridge and drops a knee busting 2800 feet in about 3 miles to a junction with the John Muir Trail. The trail to Half Dome continues to the right but take a left here. In just a few hundred yards you will see a couple nice campsites on the right next to Sunrise Creek.
Day 3 – Summit Day
For Half Dome summit day make your way back to the junction from the night before and turn left. It’s a flat half mile along the JMT to the next junction. Turn right here and start up the hill. The trail continues to ascend through the forest for another 1.5 miles and 1800 feet before topping out on a ridge at the base of Half Dome proper. Take a few minutes to enjoy the expansive views of Little Yosemite Valley, Cloud’s Rest, and the Clark Range to the east ad Snow Creek Falls across Tenaya Canyon to the north.
After a few hundred yards of nice flat walking on the top of the ridge things begin to get interesting. This is where the stone steps begin (and the rangers often hang out to check permits). The stone steps are a series of about 400 stairs carved into the granite on the shoulder of Half Dome (called Sub-Dome). The stone steps are physically challenging and very exposed. You’re looking down a couple thousand feet on one side and almost a mile on the other. Many people with heights issues call it good only a short way u this section. There’s almost no shade here as well so you really don’t want to be here at mid-day on hot days. Near the top the stairs peter out so you end up walking up a steep granite slab. Just keep going up. You’re on almost a knife-edge ridge so you can’t get lost. Once you top out on Sub-Dome you’ll come face to face with the world-famous Half Dome Cables.
It’s time to go up the cables. You’ll want to put on your gloves and ditch your trekking poles here (stash them behind the big rock on the left). Then grab one cable in each hand and start working your way up. Only the fittest of the fit can power up the 440 vertical feet of the cables without a break so you’ll probably need a rest. The trick is to rest on the nice flat boards that stretch between the poles. Your calves will be burning if you rest too often on the steep granite between the boards. The boards are also the best place to pass other climbers, whether they’re going your direction or the other way. Communication is key. Talk to the other climbers. Let them know you want to pass, or that you’re going to let them pass. When passing, grab one cable with both hands until you’re clear. It’s pretty tight inside the cables so you want a good grip when someone goes by. Don’t be in a hurry, and DO NOT go outside the cables. And once again, if it’s wet, or if there’s lightning in the area, absolutely DO NOT GO! Climbing the cables when it’s wet or especially with a chance of lightning is a very good way to die.
When you reach the top make your way up and to the right. The best views from the top are north and east from here, across and up into Tenaya Canyon. You also get a spectacular view west into the heart of Yosemite Valley. Don’t miss the small cave out at the end of the Diving Board, the small bit of rock sticking out to the north. The cave entrance is close to the very end of the point, right at your feet. It’s much safer to climb down in there than it looks. Finally, for the best photo op, stay on the end of the point and have someone else take your pic from the top of the dome to the east. Once you’ve had your fill of the top (and don’t hurry, it’s really cool up there) retrace your steps back to the Little Yosemite Valley Campground.
It’s probably worthwhile to talk about getting back down the cables. The big choice is whether to go forwards or backwards. Lately I’ve been going down facing forwards but I’m pretty used to the cables. Going forward means you’re looking straight down into the abyss. Going down backwards gives a much more secure feeling but it can be a little awkward. The trick is to grab one cable in each hand and look at your feet as you go. Make sure to also look behind you occasionally for hikers coming up.
Day 4
Resist the urge to sprint down to the valley for a cheeseburger. It’s very much worth it to take a little time to get down. My recommendation for the hike down is a combination of two of Yosemite’s signature trails: the Mist & John Muir Trails. If you’ve never done them you’re in for a treat. Assuming it’s not late in a dry year, prepare to become one with a large waterfall. Remember to keep your electronics, sleeping bag, food and anything else that’s critical dry. To follow my recommended route down to the valley start following the Merced River downstream from the Little Yosemite Valley campground along the John Muir Trail. After about a mile of lovely walking along the river you’ll come to a junction. The shortest way down is to the right, a knee-busting descent alongside Nevada Fall. However, I recommend the longer but more scenic (and easier on the knees) route to the left. After the junction and (usually very unpleasant) bathroom you’ll quickly come to the top of Nevada Fall. Just before the bridge go up the granite slab to the right and look for the steps down to the right of a big boulder. This leads to an amazing view of the top of Nevada Fall and down the Merced River canyon.
After enjoying the view continue along the John Muir Trail over the bridge. At the junction about 1/4 mile later continue straight. Just past the junction there are terrific views of Nevada Fall, Liberty Cap, and the back of Half Dome over your shoulder to your right. Continue along this trail 0.9 miles to Clark Point, another fantastic spot with views of Nevada Fall, Half Dome, and Liberty Cap. From here turn right (head towards Nevada Fall even though this is the wrong direction) to cover the 0.4 miles down to the top of Vernal Fall. Just before you reach the top of Vernal you’ll come to a junction with the Mist Trail. Turn left and follow the river downstream 0.1 miles to the large granite slab and railing at the top of the fall.
When you’re ready follow the edge of the cliff up the granite slab to fin the trail down. The next tenth of a mile is particularly tricky so be careful. First you squeeze between a cliff and a railing for a short distance then you head down a long set of large uneven steps. This where you often start to get wet from the fall so add very slippery rocks to the challenge. And finally this trail is often very crowded. Expect day hikers swarming around you, bumping into you, etc. The temptation is to gt through this section as quickly as possible but you’ll want to take some time to enjoy the fall. Just make sure you step off the trail to stop and take pics. There’s plenty of places to do so. The best of these photo ops is on the river side of the trail near the base of steepest part of the stairs. There’s often a rainbow or two or three in the mist from the fall. You’ll probably get wet here but it’s a great spot to take in the view, the roar of the falls, and the feeling of getting soaked. It’s a great sensory overload experience.
From this view point there’s still several hundred feet of (possibly wet) stairs to descend but once you finish them you’re on paved trail for the rest of the hike. Follow the paved path over the bridge, look right for your last glimpse of Vernal Fall, then descend the final 0.8 miles to Happy Isles. From here it’s a little under a mile walk to Curry Village or you can get on the shuttle to wherever you need to go.
Half Dome from Glacier Point or Mono Meadow
This route is a great option if the other two don’t work out for permit or logistics reasons. There are 2 potential starting points for this route. Both put you at Illiouette Creek for the first night but Glacier Point offers the more scenic first day. Try for that permit first. To do this hike as moderately strenuous you’ll want to do it in 4 days but it can be done in three. You can do this as an out and back hike but, like the Tenaya Lake option, it’s better as a point to point ending at Curry Village. The text below details that option.
The Trailheads – Both trailheads are on the Glacier Point Road. The Mono Meadow trailhead is a small signed dirt parking lot on the right about XX miles from the Hwy 41 junction. There are no services here so bring everything you need. The Glacier Point trailhead is XX miles further at the end of the road. There are restrooms here and a small store with a very minimal amount of camping supplies. The store usually has stove fuel but does not rent bear cans.
Traffic and Parking – Glacier Point can get very crowded in the summer. It has a large parking lot but that can fill up early, especially on weekends. Plan to be there before 9am to get a spot. Parking is never a problem at the Mono Meadow trailhead.
Map
The Route
| Miles | Elevation | Hours | |
| Day 1 | 2.9/3.8 | -900/-830 | 2-3 |
| Day 2 | 5.2 | +1260/-1500 | 4-5 |
| Day 3 | 5.2 | +2850/-2850 | 6-8 |
| Day 4 | 3.77 | +540/-2630 | 3-4 |
Day 1
If you start from Glacier Point be sure to take a few minutes to walk out to the point. It’s about 100 yards past the front of the store. From here you get an unparalleled view of Yosemite Valley from Half Dome all the way west to El Capitan. After enjoying the view walk back past the store. From the store, with Half Dome on your left the trailhead is directly in front of you. This is a short hiking day so take your time and enjoy the stunning view of Vernal and Nevada Falls as you descend along the Illilouette Canyon cliff. The views are stunning but this section of trail has very little shade and can be very hot in the summer.
At mile 1.6 you come to a junction with the Illilouette Falls trail. Today’s hike is pretty short so you have plenty of time for the 1.6 mile round trip down to see the fall and back. Although it’s difficult to get a great view, Illilouette Fall is big and beautiful so even the partial view is worth the time. After visiting the fall (or not) continue along the Illilouette Creek trail (turn left if coming up from the fall, right if coming from Glacier Point). You quickly enter a lovely mixed conifer forest which provides welcome shade. The trail descends through this forest to join lovely Illilouette Creek. As you walk along the creek keep an eye out for bears and other wildlife. There aren’t many lakes in this part of the park so the creek is the primary water source for lots of animals.
About 2.1 miles past the fall trail junction you’ll come to the junction with the trail coming in from Mono Meadow. If you came from Glacier Point turn left. If you came from Mono Meadow continue straight. You’ll quickly descend to Illilouette Creek. Start looking for camping here. There are 2 great spots on the left of the trail very near the creek. There is also a great spot up the hill a little on the right. If all of those spots are taken (which they rarely are) there are a few more spots directly across the creek. Continue along the trail to where it crosses the creek, climb the little hill, then parallel the creek downstream and you’ll see them.
Day 2
Start day 2 by continuing along the trail the same direction as the day before, upstream along the creek. Very quickly the trail turns left to cross the creek. Be careful here. Early in wet seasons this crossing can be difficult or impossible. Typically, though, the creek is no more than knee deep and later in the year it can be done without getting your feet wet.
After the crossing the trail climbs up out of the creek bed and comes to a junction with the trail south to Merced Pass. Stay left to head toward Little Yosemite Valley. The trail crosses a large sandy meadow then drops down through a large burn scar from about 15 years ago. This is a great place to see wildflowers early in the season, especially at the small creek crossing. Next the trail climbs up out of the burn scar into a lovely forest which quickly becomes a magnificent stand of sugar pines. Sugar pines are the largest pine trees in the world. The grove here doesn’t have the biggest sugar pines but the trees are nonetheless impressive (as are the cones littering the forest floor).
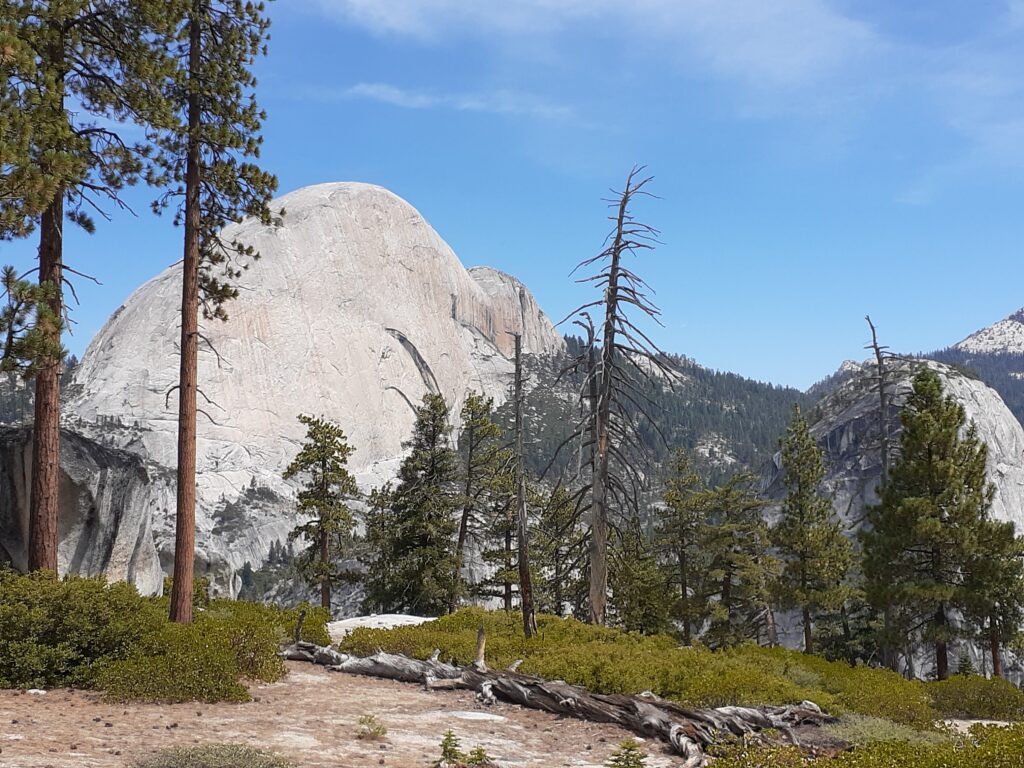
Eventually you top out on a low ridge and leave the sugar pines behind. Here nice views of the backside (South face) of Half Dome open up.
Day 3 – Summit Day
Once you leave the LYV campground it’s all uphill. Note the sign reminding you not to forget your permit as you begin the ascent. First comes a moderate ascent of about 800 feet over 1.2 miles through a lovely mixed forest of Jeffrey pine, Ponderosa pine, incense cedar, and red fir. At the junction the John Muir Trail turns right but you’re going left. The trail continues to ascend through the forest for another 1.5 miles and 1800 feet before topping out on a ridge at the base of Half Dome proper. Take a few minutes to enjoy the expansive views of Little Yosemite Valley, Cloud’s Rest, and the Clark Range to the east ad Snow Creek Falls across Tenaya Canyon to the north.
After a few hundred yards of nice flat walking on the top of the ridge things begin to get interesting. This is where the stone steps begin (and the rangers often hang out to check permits). The stone steps are a series of about 400 stairs carved into the granite on the shoulder of Half Dome (called Sub-Dome). The stone steps are physically challenging and very exposed. You’re looking down a couple thousand feet on one side and almost a mile on the other. Many people with heights issues call it good only a short way u this section. There’s almost no shade here as well so you really don’t want to be here at mid-day on hot days. Near the top the stairs peter out so you end up walking up a steep granite slab. Just keep going up. You’re on almost a knife-edge ridge so you can’t get lost. Once you top out on Sub-Dome you’ll come face to face with the world-famous Half Dome Cables.
It’s time to go up the cables. You’ll want to put on your gloves and ditch your trekking poles here (stash them behind the big rock on the left). Then grab one cable in each hand and start working your way up. Only the fittest of the fit can power up the 440 vertical feet of the cables without a break so you’ll probably need a rest. The trick is to rest on the nice flat boards that stretch between the poles. Your calves will be burning if you rest too often on the steep granite between the boards. The boards are also the best place to pass other climbers, whether they’re going your direction or the other way. Communication is key. Talk to the other climbers. Let them know you want to pass, or that you’re going to let them pass. When passing, grab one cable with both hands until you’re clear. It’s pretty tight inside the cables so you want a good grip when someone goes by. Don’t be in a hurry, and DO NOT go outside the cables. And once again, if it’s wet, or if there’s lightning in the area, absolutely DO NOT GO! Climbing the cables when it’s wet or especially with a chance of lightning is a very good way to die.
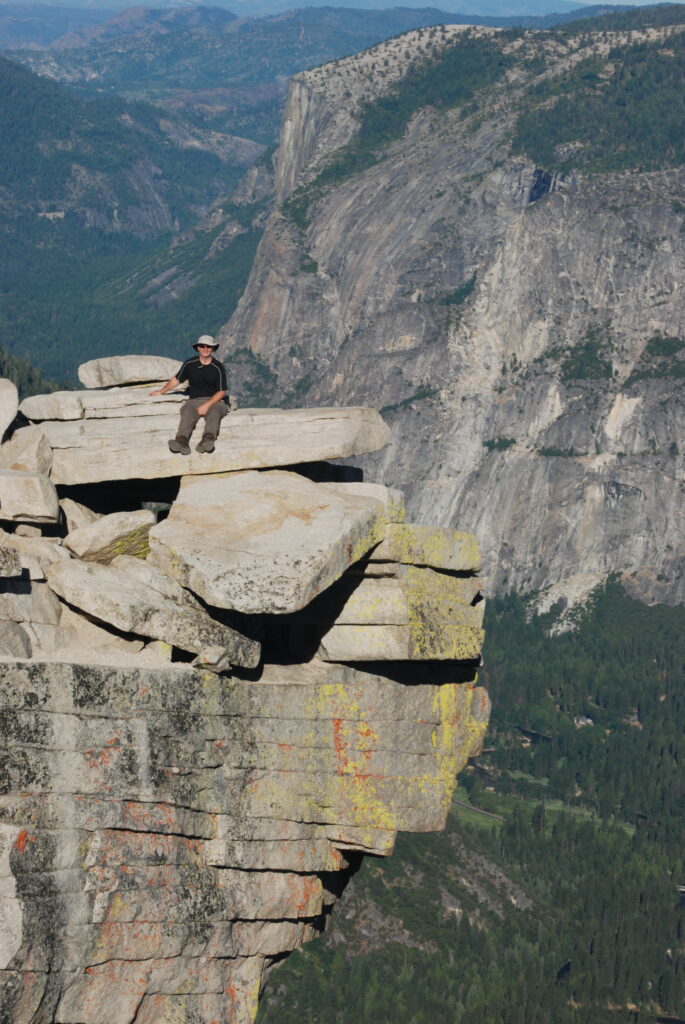
When you reach the top make your way up and to the right. The best views from the top are north and east from here, across and up into Tenaya Canyon. You also get a spectacular view west into the heart of Yosemite Valley. Don’t miss the small cave out at the end of the Diving Board, the small bit of rock sticking out to the north. The cave entrance is close to the very end of the point, right at your feet. It’s much safer to climb down in there than it looks. Finally, for the best photo op, stay on the end of the point and have someone else take your pic from the top of the dome to the east. Once you’ve had your fill of the top (and don’t hurry, it’s really cool up there) retrace your steps back to the Little Yosemite Valley Campground.
It’s probably worthwhile to talk about getting back down the cables. The big choice is whether to go forwards or backwards. Lately I’ve been going down facing forwards but I’m pretty used to the cables. Going forward means you’re looking straight down into the abyss. Going down backwards gives a much more secure feeling but it can be a little awkward. The trick is to grab one cable in each hand and look at your feet as you go. Make sure to also look behind you occasionally for hikers coming up.
Day 4
Resist the urge to sprint down to the valley for a cheeseburger. It’s very much worth it to take a little time to get down. My recommendation for the hike down is a combination of two of Yosemite’s signature trails: the Mist & John Muir Trails. If you’ve never done them you’re in for a treat. Assuming it’s not late in a dry year, prepare to become one with a large waterfall. Remember to keep your electronics, sleeping bag, food and anything else that’s critical dry. To follow my recommended route down to the valley start following the Merced River downstream from the Little Yosemite Valley campground along the John Muir Trail. After about a mile of lovely walking along the river you’ll come to a junction. The shortest way down is to the right, a knee-busting descent alongside Nevada Fall. However, I recommend the longer but more scenic (and easier on the knees) route to the left. After the junction and (usually very unpleasant) bathroom you’ll quickly come to the top of Nevada Fall. Just before the bridge go up the granite slab to the right and look for the steps down to the right of a big boulder. This leads to an amazing view of the top of Nevada Fall and down the Merced River canyon.
After enjoying the view continue along the John Muir Trail over the bridge. At the junction about 1/4 mile later continue straight. Just past the junction there are terrific views of Nevada Fall, Liberty Cap, and the back of Half Dome over your shoulder to your right. Continue along this trail 0.9 miles to Clark Point, another fantastic spot with views of Nevada Fall, Half Dome, and Liberty Cap. From here turn right (head towards Nevada Fall even though this is the wrong direction) to cover the 0.4 miles down to the top of Vernal Fall. Just before you reach the top of Vernal you’ll come to a junction with the Mist Trail. Turn left and follow the river downstream 0.1 miles to the large granite slab and railing at the top of the fall.
When you’re ready follow the edge of the cliff up the granite slab to fin the trail down. The next tenth of a mile is particularly tricky so be careful. First you squeeze between a cliff and a railing for a short distance then you head down a long set of large uneven steps. This where you often start to get wet from the fall so add very slippery rocks to the challenge. And finally this trail is often very crowded. Expect day hikers swarming around you, bumping into you, etc. The temptation is to gt through this section as quickly as possible but you’ll want to take some time to enjoy the fall. Just make sure you step off the trail to stop and take pics. There’s plenty of places to do so. The best of these photo ops is on the river side of the trail near the base of steepest part of the stairs. There’s often a rainbow or two or three in the mist from the fall. You’ll probably get wet here but it’s a great spot to take in the view, the roar of the falls, and the feeling of getting soaked. It’s a great sensory overload experience.
From this view point there’s still several hundred feet of (possibly wet) stairs to descend but once you finish them you’re on paved trail for the rest of the hike. Follow the paved path over the bridge, look right for your last glimpse of Vernal Fall, then descend the final 0.8 miles to Happy Isles. From here it’s a little under a mile walk to Curry Village or you can get on the shuttle to wherever you need to go.